


 In this post, I walk through integrating JFrog Artifactory with Fujitsu Enterprise Postgres and using Transparent Data Encryption to encrypt the Artifactory metadata stored in the database.
Integration architecture and deployment overview
 JFrog Artifactory has long been trusted for enterprise‑grade artifact management. It offers the following features:
- A central hub for storing, managing, and distributing software binaries and artifacts
- Supports a wide range of package types (e.g., Docker, Maven, Npm, PyPI)
- Integrates with CI/CD tools to streamline software delivery
- Offers version control, access control, and replication features
JFrog has standardized on PostgreSQL as the preferred and recommended database for all JFrog Platform products.
As Fujitsu Enterprise Postgres is PostgreSQL-compatible, and provides additional security features such as Transparent Data Encryption, it makes sense to integrate Fujitsu Enterprise Postgres with JFrog Artifactory, to help secure the JFrog metadata held within the database, such as security configuration, access control, and supply chain intelligence.
There are numerous ways both JFrog Artifactory and Fujitsu Enterprise Postgres may be installed and configured in different environments.
Here we describe a simple single-node installation and configuration, on an Azure Linux VM, that illustrates how JFrog Artifactory and Fujitsu Enterprise Postgres can work together. Note that in a proper production setup, you would likely want to set up an HA configuration, install the database on a separate server, and configure SSL communication to the JFrog GUI and between JFrog Artifactory and the database, etc.
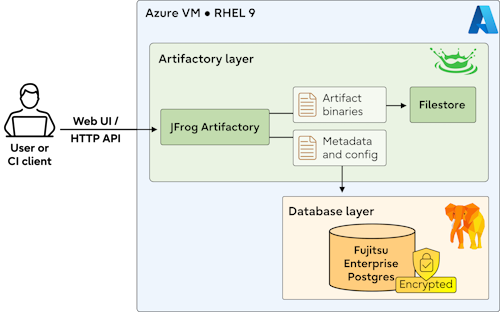
Setting up the VM
 In this case we will install JFrog Artifactory and Fujitsu Enterprise Postgres on an Azure RHEL9 Linux VM. Installation on other VMs would be similar, but you should ensure that the Operating System and version are supported by both products.
Hardware, OS and general requirements should be guided by the following JFrog documentation:
- https://docs.jfrog.com/installation/docs/supported-platforms-and-os
- https://docs.jfrog.com/installation/docs/hardware-sizing-matrix
- https://docs.jfrog.com/installation/docs/general-system-requirements
For our purposes, we create the following Azure Linux VM, using the Azure Portal web-site:
- RHEL9.6 (Gen 2)
- 256GB OS disk
- b4as_v2 size (4 vcpus, 16GB RAM)
As part of the VM creation, some basic network configuration is required:
- Modify the existing SSH inbound port rule (or create it, if it doesn't exist) to allow (restrict) SSH only from the IP address of the client system from which you plan to SSH to the VM from.
- Add an inbound port rule to allow the TCP protocol on port 8082 from IP address of the client system on which you plan to run a web browser to login to the JFrog web GUI, once the software is installed and configured and everything is up and running.
It is important to ensure an Administrator account is configured (default: azureuser) with SSH access (for example, by supplying an SSH public key of the account on the client system from which you can SSH to the VM from; select Use existing public key and supply the SSH public key).
Configuring the filesystem
For simplicity, a single OS disk will be used, for OS, JFrog Artifactory and Fujitsu Enterprise Postgres installation, Artifactory local filestore and Fujitsu Enterprise Postgres database.
All the artifact information is stored in Fujitsu Enterprise Postgres while the artifact binary data is stored in the file system (under $JFROG_HOME/artifactory/var/data/artifactory/filestore).
(Note that a proper production system would run Artifactory and Fujitsu Enterprise Postgres on separate servers, with a separate Azure data disk for the database and perhaps cloud storage for the Artifactory filestore)
For our basic setup, the following filesystem layout/partitioning is sufficient:
| Mount | Size | Rationale |
| / | 15 GB | OS + /opt installs |
| /usr | 20 GB | Packages |
| /tmp | 8 GB | Upload / unpack temps |
| /var | ~175 GB | Artifactory filestore dominates |
| /pgdata | 24 GB | PG metadata only |
| Swap | 8 GB | JVM + PG safety |
Azure Linux VM creation does not automatically expand the partition and filesystem to match the OS disk size, so some manual steps are required to fully utilize the available space.
The steps to expand the Azure OS disk and configure the logical volumes are described later in this post. Be sure to follow these detailed steps before performing any software installation.
Setting up the JFrog Artifactory
Installing Artifactory
 Before starting, ensure the necessary JFrog Artifactory license has been obtained, as you will need to supply it in the JFrog Web GUI, once Artifactory is up and running.
There are different ways to install JFrog Artifactory for a single-node deployment.
For RHEL9, Artifactory can be installed from RPM, following the procedure documented at https://docs.jfrog.com/installation/docs/linux-package.
You first need to SSH to the Azure VM using the administrator account (default: azureuser).
Before installing Artifactory, it is a good idea to first run the JFrog diagnostics tool, to verify that the required system resources are available and sufficient. The diagnostics tool may be downloaded using:
wget https://releases.jfrog.io/artifactory/run/jfrog-diagnostics-util/0.1.1/diagnostics-linux-amd64
chmod ug+x diagnostics-linux-amd64
The various diagnostic tests should be run according to https://docs.jfrog.com/installation/docs/preflight-check. For example:
- To verify sufficient CPU cores, memory and storage for Artifactory:
./diagnostics-linux-amd64 inspect system --product=artifactory
- To verify network suitability and required ports availability for Artifactory:
./diagnostics-linux-amd64 inspect connectivity --product=artifactory
To register the Artifactory RPM repository and install the Artifactory RPM, the following commands must be run:
wget https://releases.jfrog.io/artifactory/artifactory-pro-rpms/artifactory-pro-rpms.repo -O jfrog-artifactory-pro-rpms.repo
sudo mv jfrog-artifactory-pro-rpms.repo /etc/yum.repos.d/
sudo dnf install jfrog-artifactory-pro-7.111.11
This installs Artifactory to /opt/jfrog/artifactory (by default, JFROG_HOME=/opt).
Artifactory is set up as an autostart service (artifactory.service). We'll reboot the system after the Fujitsu Enterprise Postgres database is set up and configured for use by Artifactory.
Setting up the firewall
Once the artifactory service is up and running and connected to the database, the JFrog web GUI is accessible at http://<VM-ip-address>:8082.
Port 8082 needs to be allowed through the firewall (and the firewall rule made persistent) using the following commands:
sudo firewall-cmd --add-port=8082/tcp --permanent
sudo firewall-cmd --reload
sudo firewall-cmd --list-all
Note that firewalld and firewalld-cmd are the default firewall and firewall CLI for Linux distros RHEL, Rocky, CentOS, Fedora and SUSE.
Configuring Artifactory for Fujitsu Enterprise Postgres
Edit the configuration file /opt/jfrog/artifactory/var/etc/system.yaml (note: owned, and only writeable by, user artifactory) and specify the following Fujitsu Enterprise Postgres18 JDBC driver details, under shared -> database, as shown below:
## Database Configuration
database:
    ## To run Artifactory with any database other than PostgreSQL allowNonPostgresql set to true.
    #   allowNonPostgresql: false
    ## One of mysql, oracle, mssql, postgresql, mariadb
    ## Default Embedded derby
    ## FEP18
      type: postgresql
      driver: org.postgresql.Driver
      url: "jdbc:postgresql://localhost:27500/artifactory"
      username: artifactory
      password: password
Ensure that whatever password is specified here matches the password specified for the artifactory user that is created in the database (described later in this post). Once Artifactory is started, the password is obfuscated in the system.yaml file.
https://docs.jfrog.com/installation/docs/configure-artifactory-to-use-postgresql-single-node
Setting up Fujitsu Enterprise Postgres database
Prerequisite software installation
Fujitsu Enterprise Postgres has certain prerequisites that need to be installed first. These system software packages are listed in the Installation and Setup Guide for Server > Packages Required for RHEL9.
- Fujitsu Enterprise Postgres manuals
- Enterprise Postgres 18 SP1 Installation and Setup Guide for Server
Some of the packages only need to be installed for use of particular Fujitsu Enterprise Postgres features. The list of those determined to be necessary for our case of using Fujitsu Enterprise Postgres with JFrog Artifactory are given below. Many of them are already installed in the RHEL9 image used by Azure.
| Package | Already installed? |
| alsa-lib |  |
| audit-libs |  |
| bzip2-libs | |
| cyrus-sasl-lib | |
| glibc | |
| glibc.i686 | |
| libnsl2 | |
| libicu | |
| libgcc | |
| libstdc++ | |
| liburing | |
| libzstd | |
| lz4-libs | |
| ncurses-libs | |
| net-tools | |
| nss-softokn-freebl | |
| numactl-libs | |
| protobuf-c | |
| unzip | |
| xz-libs | |
| zlib | |
To ensure all prerequisite packages are installed, regardless of what RHEL9 image version is used, use the following command which includes all the packages:
sudo dnf install -y alsa-lib audit-libs bzip2-libs cyrus-sasl-lib glibc glibc.i686 libnsl2
                    libicu libgcc libstdc++ liburing libzstd lz4-libs ncurses-libs net-tools
                    nss-softokn-freebl numactl-libs protobuf-c unzip xz-libs zlib
Installing Fujitsu Enterprise Postgres server
Fujitsu Enterprise Postgres server may be installed from an ISO file. You'll need to transfer the ISO to the VM (e.g., to /tmp, as there is not much space on /home). For example, to transfer using scp:
scp fsep18SP1_ae_linux64.iso azureuser@<VM-IP-address>:/tmp
Fujitsu Enterprise Postgres server is installed to /opt/fsepv18server64 by default. SSH to the VM and install it as follows:
sudo mkdir -p /mnt/fep
sudo mount -o loop -t iso9660 /tmp/fsep18SP1_ae_linux64.iso /mnt/fep
sudo /mnt/fep/install.sh
Select option 1, Fujitsu Enterprise Postgres Advanced Edition (64bit) 18 SP1, then select all the default options to complete installation. Unmount the ISO when installation is complete.
sudo umount /mnt/fep
Configuring Fujitsu Enterprise Postgres for Artifactory
It is best to run Fujitsu Enterprise Postgres server under a dedicated user. We will run it under the user postgres.
Create the postgres user as follows:
sudo groupadd --system postgres
sudo useradd --system --create-home --gid postgres --shell /bin/bash postgres
As root, create shell-script /etc/profile.d/fep.sh with the following contents, to setup PATH for when logged in as postgres (but could be modified to be for more, or all, users if desired):
if [ "$USER" = "postgres" ]; then
    PATH=/opt/fsepv18server64/bin:$PATH
fi
export PATH
Set permissions and ownership on /pgdata, allowing access only by the postgres user.
sudo chown postgres:postgres /pgdata
sudo chmod 700 /pgdata
Create subdirectory for database logs:
sudo mkdir /pgdata/logs
sudo chown postgres:postgres /pgdata/logs
sudo chmod 700 /pgdata/logs
As root, create the log rotation configuration file /etc/logrotate.d/fep_jfrog_db (this results in 5 days of logs being kept, and older logs being compressed):
/pgdata/logs/fep-jfrog-*.log {
    daily
    rotate 5
    missingok
    notifempty
    compress
    delaycompress
    nocreate
}
Fujitsu Enterprise Postgres server needs to be configured to autostart on boot, before the Artifactory service starts.
To set up the Fujitsu Enterprise Postgres autostart service, as root, create the file /usr/lib/systemd/system/fsepsvoi_jfrog_db.service with the contents below:
# Copyright FUJITSU LIMITED 2026
[Unit]
Description=FUJITSU Enterprise Postgres jfrog_db
Requires=network-online.target
After=network.target network-online.target
Before=artifactory.service
[Service]
ExecStart=/bin/bash -c '/opt/fsepv18server64/bin/pgx_symstd start /opt/fsepv18server64 /pgdata/jfrog_db'
ExecStop=/bin/bash -c '/opt/fsepv18server64/bin/pgx_symstd stop /opt/fsepv18server64 /pgdata/jfrog_db'
ExecReload=/bin/bash -c '/opt/fsepv18server64/bin/pgx_symstd reload /opt/fsepv18server64 /pgdata/jfrog_db'
Type=forking
User=postgres
Group=postgres
[Install]
WantedBy=multi-user.target
Enable the Fujitsu Enterprise Postgres database service:
sudo systemctl enable fsepsvoi_jfrog_db.service
For the remaining Fujitsu Enterprise Postgres configuration, start a login shell as the postgres user:
sudo su – postgres
Create a new Fujitsu Enterprise Postgres database cluster that uses character encoding/collation/classification compatible with Artifactory:
initdb -D /pgdata/jfrog_db --encoding=UTF8 --lc-collate=C --lc-ctype=C
Configure logging, by appending the following lines to file /pgdata/jfrog_db/postgresql.conf:
logging_collector = on
log_destination = 'stderr'
log_directory = '/pgdata/logs'
log_filename = 'fep-jfrog-%Y-%m-%d.log'
log_rotation_age = 1d
log_rotation_size = 0
log_truncate_on_rotation = on
In our simplified setup, Artifactory is run on the same server as the database.
Enforce SCRAM password authentication for all localhost TCP connections, and for Artifactory connections over Unix sockets, by inserting higher-priority rules in pg_hba.conf, using the following command:
sed -i '/local[[:space:]]\+all[[:space:]]\+all[[:space:]]\+trust/i \
local   artifactory     artifactory                             scram-sha-256\
host    artifactory     artifactory     127.0.0.1/32            scram-sha-256\
host    artifactory     artifactory     ::1/128                 scram-sha-256\
host    all             all             127.0.0.1/32            scram-sha-256\
host    all             all             ::1/128                 scram-sha-256
' /pgdata/jfrog_db/pg_hba.conf
The use of Fujitsu Enterprise Postgres' Transparent Data Encryption is optional, but by having the database data encrypted, it protects the data from being accessed even if the database files or disk are stolen.
For our purposes here, we will store the encryption key locally (protected by a passphrase and file permissions), but Fujitsu Enterprise Postgres does support storing the key in a remote key management server, for example, accessed via the Key Management Interoperability Protocol (KMIP).
To use Transparent Data Encryption for the Artifactory database, we define a default tablespace that is encrypted. This will be used by Artifactory when it connects to the database and creates its tables etc.
Append the following lines to /pgdata/jfrog_db/postgresql.conf:
keystore_location = '/pgdata/ks'
tablespace_encryption_algorithm = 'AES256'
default_tablespace = 'tsencrypt'
Create directories for the keystore_location and tablespace and set permissions to only allow access by the postgres user:
mkdir /pgdata/ks /pgdata/ts
chmod 700 /pgdata/ks /pgdata/ts
Start the Fujitsu Enterprise Postgres database cluster (this is a temporary manual startup, to allow configuration):
pg_ctl -D /pgdata/jfrog_db start
Set the Transparent Data Encryption Master Encryption Key, protected by a specified passphrase:
psql -c "SELECT pgx_set_master_key('<passphrase>');"
The <passphrase> is the passphrase that will be used to open the keystore. The master encryption key is protected by this passphrase, so avoid specifying a short simple string that is easy to guess. The master encryption key is created from random bit strings, encrypted with the specified passphrase and stored in the file keystore.ks in the keystore_location.
Set up the keystore to automatically open using the following command:
pgx_keystore --enable-auto-open /pgdata/ks/keystore.ks
Create the database and user required by Artifactory using the psql command below.
Here the password must match the password specified in Artifactory's system.yaml file.
psql << 'EOF'
CREATE USER artifactory WITH PASSWORD 'password';
CREATE DATABASE artifactory WITH OWNER=artifactory ENCODING='UTF8';
GRANT ALL PRIVILEGES ON DATABASE artifactory TO artifactory;
EOF
We have finally reached the end of the basic setup and configuration of Fujitsu Enterprise Postgres and JFrog Artifactory.
Exit (or ^D) the current shell, so you pop back to the VM administrator shell.
The Azure VM can now be rebooted, resulting in the Fujitsu Enterprise Postgres database and JFrog Artifactory services being started.
sudo reboot
JFrog Web GUI
 After the VM restarts, you should be able to use a web browser to log in to the JFrog web GUI via the URL http://<VM-IP-address>:8082.
It will take the services a few minutes to fully start up.
Log in using the username admin, and password password.
You will then be asked to get started (onboarding process):
- Reset the admin password (specify a new admin password).
- Activate the license (specify license key/drop in license file/enter URL).
- Set the Base URL (in our case, we'll just use: http://<VM-IP-address>:8082).
- Configure default proxy server (if required).
- Create Repositories (select package types you want to support and have repositories created for them) e.g., Ansible, Docker, Npm, RPM.
Going deeper: Detailed filesystem configuration
The CloudVault RHEL 9.6 Gen2 image was used in this example, which initially creates separate logical volumes for /, /usr, /tmp, /var, and /home.
If using a different RHEL9 image, verify the initial filesystem layout with
lvs
lsblk
df -h
and adjust the following filesystem configuration procedure accordingly.
The initial OS disk layout needs to be expanded and fully consumed by LVM, with logical volumes allocated deterministically for system, application and swap usage. The /var filesystem is deliberately given the remaining capacity, while database data is isolated under /pgdata.
Make the Azure OS disk visible to Linux + LVM
sudo growpart /dev/sda 4
sudo pvresize /dev/sda4
Grow the root filesystem (/) to 15 GB
sudo lvextend -L 15G /dev/rootvg/rootlv
sudo xfs_growfs /
Grow /usr to 20 GB
sudo lvextend -L 20G /dev/rootvg/usrlv
sudo xfs_growfs /usr
Grow /tmp to 8 GB
sudo lvextend -L 8G /dev/rootvg/tmplv
sudo xfs_growfs /tmp
Add swap
sudo lvcreate -L 8G -n swaplv rootvg
sudo mkswap /dev/rootvg/swaplv
sudo swapon /dev/rootvg/swaplv
Add Fujitsu Enterprise Postgres/PostgreSQL LV
sudo lvcreate -L 24G -n pglv rootvg
sudo mkfs.xfs /dev/rootvg/pglv
sudo mkdir -p /pgdata
sudo mount /dev/rootvg/pglv /pgdata
Give /var the remaining space
sudo lvextend -l +100%FREE /dev/rootvg/varlv
sudo xfs_growfs /var
Persist the state
Create the Bash script below and run it using sudo sh persist-mounts-and-swap.sh
Script: persist-mounts-and-swap.sh
#!/usr/bin/env bash
set -euo pipefail
echo "==> Persisting mounts and swap (FEP layout with /pgdata)"
PG_LV="/dev/rootvg/pglv"
PG_MOUNT="/pgdata"
PG_FS_OPTS="defaults,noatime,nofail"
SWAP_LV="/dev/rootvg/swaplv"
uuid_of() {
  blkid -s UUID -o value "$1"
}
fstab_has_mount() {
  awk '$1 !~ /^#/ {print $2}' /etc/fstab | grep -qx "$1"
}
fstab_has_swap() {
  grep -Eq "^[^#]*\b$SWAP_LV\b.*swap" /etc/fstab
}
add_fstab() {
  echo "$1" >> /etc/fstab
  echo "    added: $1"
}
# /pgdata
if [[ -b "$PG_LV" ]]; then
  echo "==> Configuring /pgdata mount"
  mkdir -p "$PG_MOUNT"
  PG_UUID="$(uuid_of "$PG_LV")"
  if ! fstab_has_mount "$PG_MOUNT"; then
    add_fstab "UUID=$PG_UUID  $PG_MOUNT  xfs  $PG_FS_OPTS  0  0"
  else
    echo "    fstab already contains entry for $PG_MOUNT"
  fi
fi
# Swap
if [[ -b "$SWAP_LV" ]]; then
  echo "==> Configuring swap"
  SWAP_UUID="$(uuid_of "$SWAP_LV")"
  if ! grep -q "$SWAP_UUID" /etc/fstab; then
    add_fstab "UUID=$SWAP_UUID  none  swap  defaults  0  0"
  else
    echo "    swap already present in fstab"
  fi
fi
# Activate
echo "==> Activating mountpoints and swap"
mount -a
swapon -a
# Result
echo "==> Current state:"
df -h | egrep 'Filesystem|/pgdata'
swapon --show
A note on before you begin
 This article is provided for general information and guidance.
While I’ve done my best to make sure the information is accurate and useful, your results may vary depending on your environment and how you use the information. Please consider your own requirements and test any changes before putting them into production.


 PostgreSQL Insider

